Host a Website with Raspberry Pi
In just minutes, you can have a personal or professional website hosted from your own home and a mini-PC, such as a standard Raspberry Pi.
Requirements
- Raspberry Pi or similar Linux-based mini-PC to run the web server on.
- Ethernet cord to connect your Pi to your router or direct internet connection.
Installation
- Navigate to https://www.raspberrypi.com/software/ and download the Raspberry Pi Imager.
- Run the program, select your Operating System (we recommend the “Lite” version for this application), Storage (i.e. the microSD card you will insert into your Pi), and write the data to the card.
- Open the drive in your File Explorer (you may need to remove and re-insert the drive to do so). Add an empty file with no extension that is only called ssh. Right click on the drive and select Eject.
- Insert the microSD card back into your Pi, connect it to your router with an Ethernet cable, and plug the power cable into a wall outlet.
Web Server Setup
- Open Windows PowerShell (right click Windows icon in lower left) and enter the following command to connect to the Pi:
ssh pi@raspberry.local - Type yes to accept and enter the default password (raspberry).
- Paste in each of the following commands, pressing enter after each line, to update the Operating System and install the web server:
sudo apt update && sudo apt upgrade
sudo apt install apache2 php
sudo systemctl --now enable apache2
Your Website is Now Active!
- Test your site by navigating in your web browser to the local IP listed at the top of the PowerShell window (e.g. 192.168.0.136).
Configure Permissions and Update the Site
- Make updating the content easy by adjusting the following permissions. Back in the PowerShell window, run the following commands:
sudo usermod -aG www-data pi
sudo chown pi:www-data -R /var/www/
sudo chmod g+s /var/www/
sudo chmod 755 -R /var/www/ - Download the FileZilla Client from https://filezilla-project.org/ to make managing files on your new website easier.
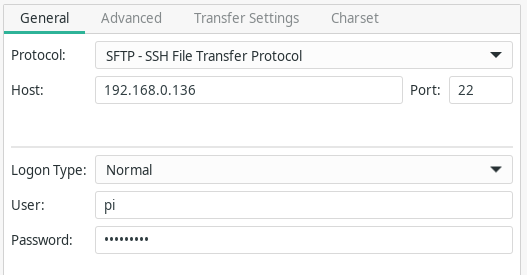
- After installation, add a New Site in Filezilla and enter the below information:

Note: Host should be your Pi's own IP address and Password is raspberry.
4. Navigate to the remote folder path /var/www/html and drop in your own files.
5. Check the site again in the web browser to confirm the changes.
Bonus Tip: Make Your Website Public
- To make your website public and accessible to the world, forward port 80 in your router.
- Access your router as you normally would. Find the section labelled port forwarding or virtual servers. Add a new rule to forward port 80 to the IP address of your Pi.
- Find your public IP address at https://whatismyipaddress.com and share it with your friends so they can access your website too!